
You’re a wordsmith; you’re already set up for blogging success.
Blogging offers a space for your creativity and a potential avenue to earn passive income, possibly even replacing your full-time job’s paycheck. With dedication, you could become a full-time blogger. I did it, even as a non-native English speaker! While I’m not raking in “$10k a month” yet, I’m on my way and loving the journey. If you’re already adept at writing, the blogging world is yours to conquer. Let’s dive into how to kickstart your blog effectively, even as a beginner. Don’t wait for the “right time”; seize the moment and start today, shaping your future.
Here’s an overview of the blog-starting process:
- Pick the right topic for your blog and get some design inspiration
- Pick the right domain name and hosting package and create your blog
- Install WordPress (and tweak it to your needs)
- Install a new (slick-looking) theme for your blog
- Install basic WordPress plug-ins on your blog
- Install Google Analytics to track your traffic
- Create a header section for your blog
- Install a few useful widgets
- Create your first few basic pages that a new blog needs
- Write your first blog post (and learn how to get traffic)
- Start an email list from day one
- Don’t waste your time on technicalities – ask for (cheap) help from professionals
- Start writing, publishing, and promoting – persist until you succeed
- Monetize your blog and earn $$$ from your efforts
You can set up your blog in one hour or less if you follow the steps and do’s and don’ts I give you! Let’s go! Remember that steps from 0 to 3 are the most important for starting a blog. Once you have these done (hats off), you can then relax a little with a martini in hand, before you continue with 4 to 12. It’s easy to get overwhelmed if you’re just learning to blog as a beginner, so make sure you approach things in stages.
How to start a blog as a writer – 14 Steps
1. Pick the right topic for your blog and get some design inspiration
All successful bloggers cover a specific topic in depth. If your niche is down, you’ll be more authoritative in the eyes of your readers and the search engines. Visitors to your blog will know what to expect, and you’ll gain more loyal readers faster. Blogging about one area will also enable you to develop expertise and share unique, valuable knowledge. Blogging can be a lucrative endeavor, and there are hundreds of successful bloggers earning $5,000-$10,000 a month. Are you ready to achieve success yourself? If you’re a writer, you have endless niches to pick from. You may cover something related to language, books, grammar, reviews, literature, publishing, editing, freelance writing, motivation, or something else you’re passionate about. Take inventory of your strengths, and focus efforts on areas you already know a lot about. You need something that will be a natural fit for your skills and interests.
Some of the blog topics proven to be profitable are related to:
- Personal Finance
- Personal development
- Health and nutrition
- Travel and adventure
- Fashion and beauty
- College and Education
- Home and gardening
- Online publishing
- Blogging and marketing
- Weight loss and fitness
The best thing is that there are dozens of sub-niches within any significant niche. The deeper and more specific you go, the better. Don’t know what to write about? Don’t let it stop you! I had no clue when I was starting. Don’t worry, it will develop over time. For now, come up with a general idea. Also, find a couple of bloggers you admire and use their online platforms as an inspiration for your own thing. Type “your niche or main keyword + blog” in Google, and you’ll find great examples within a couple of seconds. Now let’s move on to the significant first step as we get down and dirty starting your blog.
2. Pick the right domain name and hosting package and create your blog
Now it’s time to pull the trigger and bring your blog into existence.
You only need two things to get started:
- a) A domain name and hosting package (here I recommend Accuweb or Bluehost, which are the most user-friendly hosting company for new bloggers).
- b) A content management system (here I recommend WordPress blogging platform which is the best and most popular platform for bloggers around the world) Bluehost will make your site load fast and keep it secure, while WordPress will let you customize your blog and publish amazing content. It’s a perfect combination for new bloggers because the two services are integrated. Once you have your Bluehost account, setting up WordPress will be as easy as making a few clicks (you’ll see more on that below). Make sure to click here to go to Bluehost and then follow the step-by-step instructions below to get your blog ready in a couple of minutes.
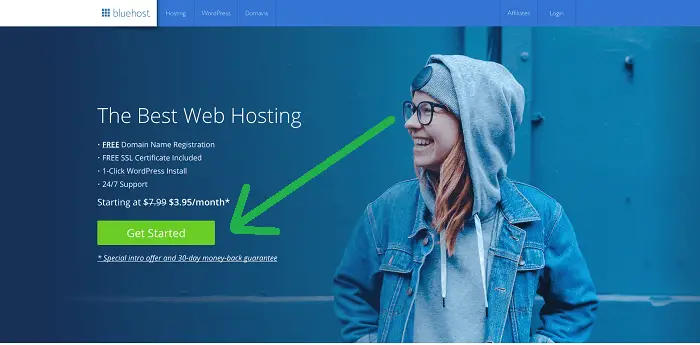
First, click on the “Get started” button on the home page:
Then you’ll go to a page showing you different pricing options and web hosting plans:
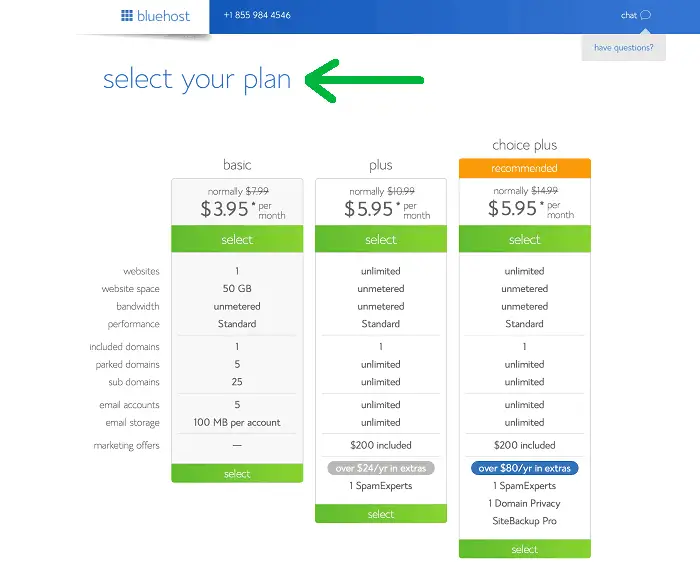
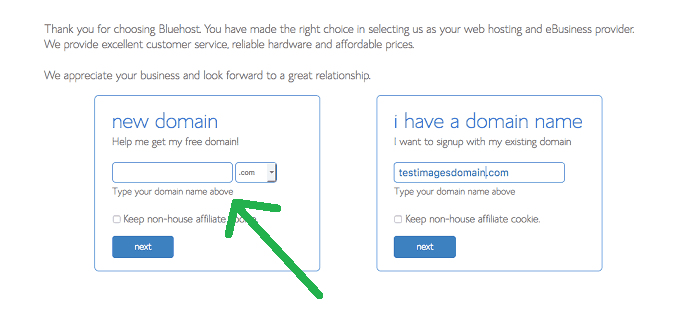
As a newbie, you can pick the basic plan for $3.95. This is the best plan for writers and bloggers who are new to the game. After clicking on the plan of your choice, you’ll go to a page where you can select your new domain name. A domain name is the main address of your blog (for example, for me it’s rafalreyzer.com ). So make sure you pick the right name! But if you’re still not sure, click “choose later” and move to the next step.
Next, you will need to fill out some personal information to set up your account:
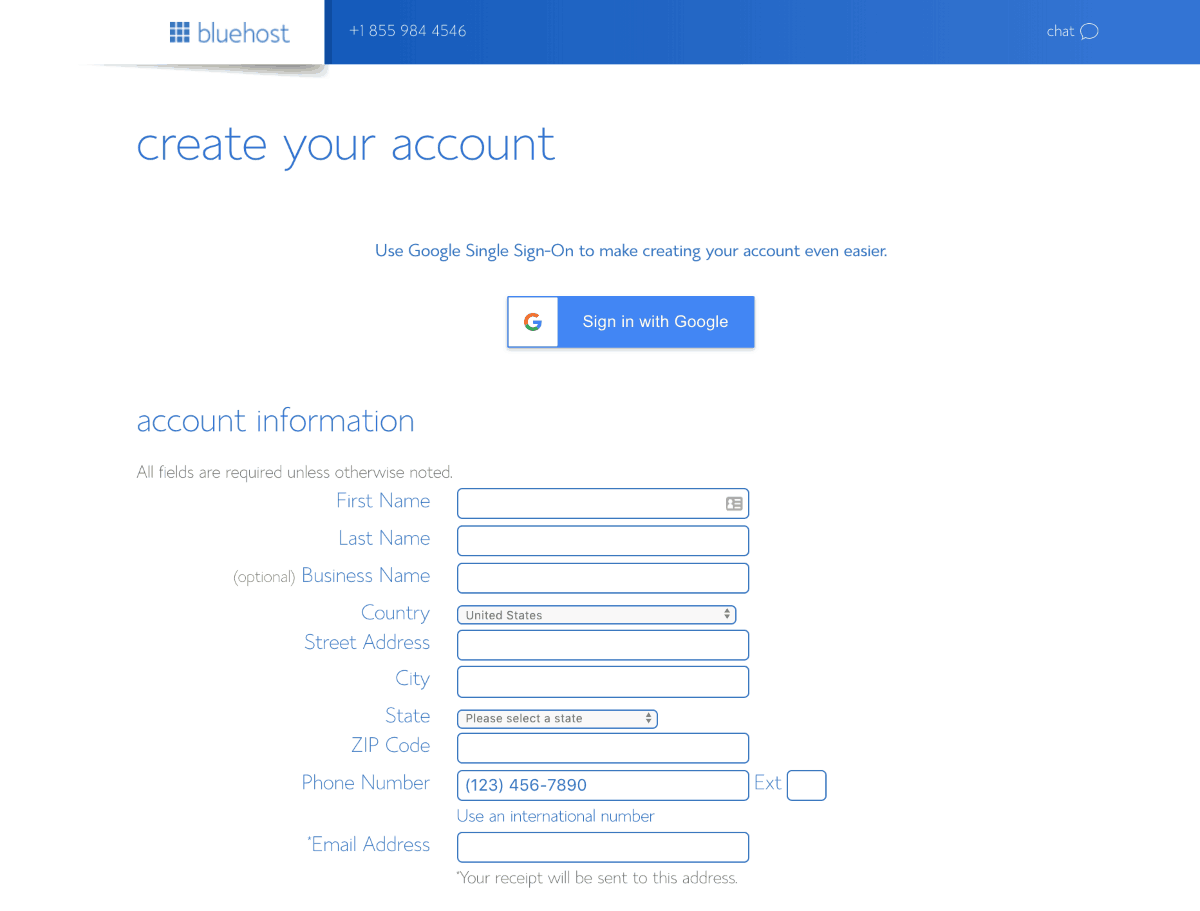
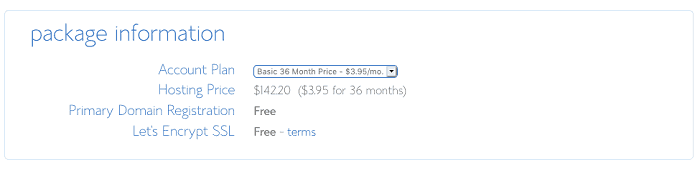
Then scroll down to check the package information. Here you have three different options. You can choose to sign up for 12, 24, or 36 months. If you’re serious about becoming a blogger, you should pick the 36-month option as it provides the best value for the money. It also shows your commitment to making your blog successful in the long term. Decide now that you will stick with it for at least three years and make your blog a massive success. However, if you’re short on dough, you can also grab the 12-month option. The important thing is to get this thing rolling. And remember – if you change your mind, you still have a 30-day guarantee. During this period you’re eligible to ask for a full refund.
Once you select your plan, you can also pick from a couple of extras. These include Sitelock Security, Codeguard Basic, and Bluehost SEO Tools.
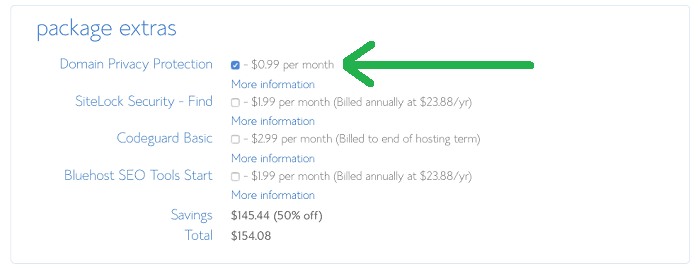
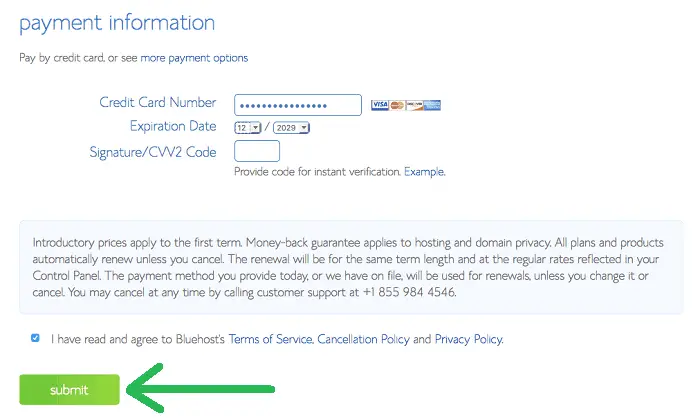
You may want to grab the Domain Privacy Protection to protect your contact info. You can skip the other two options. Finally, you need to fill out the payment information, agree to the terms and conditions of Bluehost, and click the green “Submit” button.
Congratulations, you now have your blog! You deserve a piñacolada. Now you need to set a secure password for your account, and you’re ready for the next step. Follow along and let’s do it together.
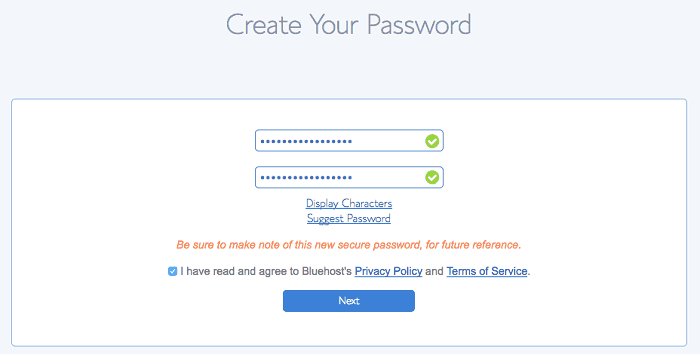
3. Install WordPress (and tweak it to your needs)
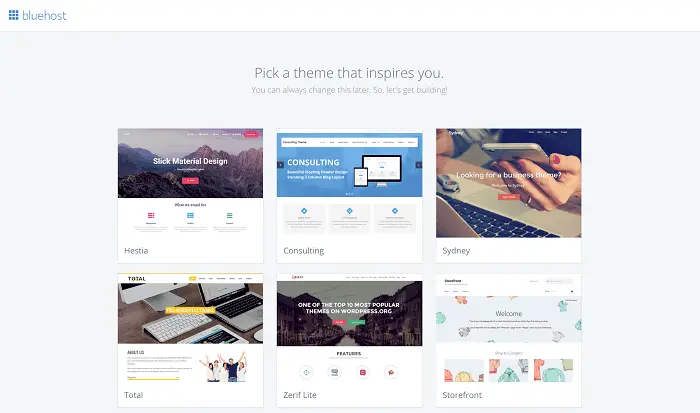
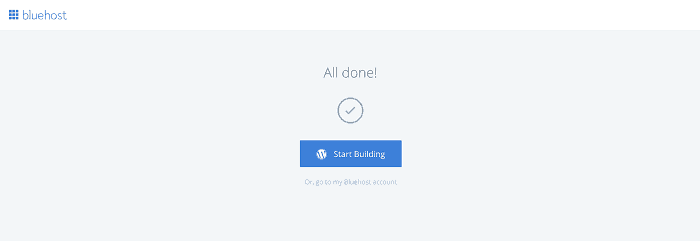
After creating your password, you can log into the dashboard. You will be redirected to a page asking you to select your WordPress theme. Do you see how easy it is? The two services are integrated, so you don’t have to deal with technicalities. You can pick any of the available themes. And don’t worry, you may change it anytime (you will learn more about this below). Once you pick the theme, WordPress will start installing it automatically (this can take a few minutes so chill). Once it’s finished, click on “Start Building” to go to your WordPress dashboard.
Then WordPress blogging platform will ask you “What kind of sites can we help you set up?” You can click on business or personal; it doesn’t matter. But since you mean business as a new blogger, click on the business option to feel more powerful. 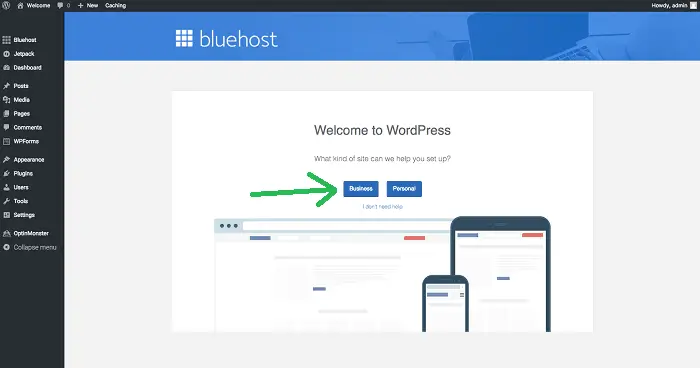
In the next section, you will need to choose your site title and description. Write the title of your new blog and say what it is about. If you’re still not sure, you can skip this step and take care of it later.
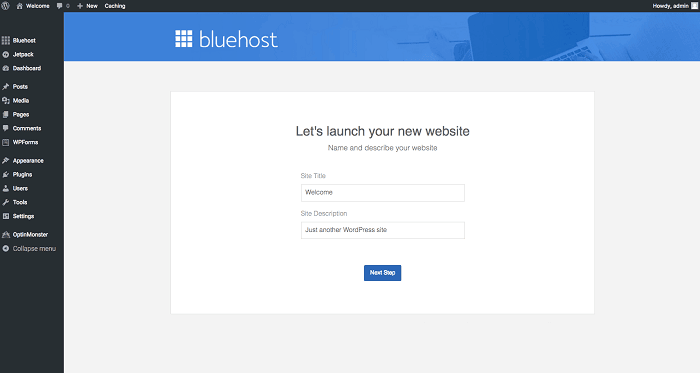
After that, you’ll be asked if you’re going to update your page with news and blog posts. Of course, you will, that’s the whole point of blogging! You can proudly click “yes”. Next, Bluehost will ask you if you would like a “static homepage” or a page with the “most recent blog posts”. You can pick either option, but the majority of bloggers use a static homepage and a separate blog page with your recent posts (like on this blog). Remember that you can always change it in the future if you feel like it. Next, you’ll be asked if you want to set up a contact page. For now, you can select “no” because you can take care of it later. Now click on the “Connect to WordPress” button and then you’ll be asked to connect your account to Jetpack.
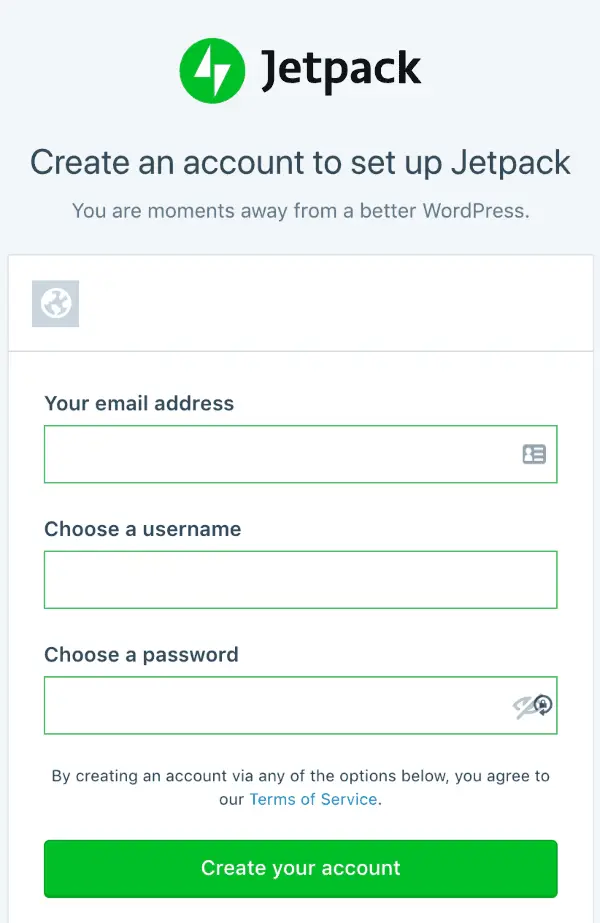
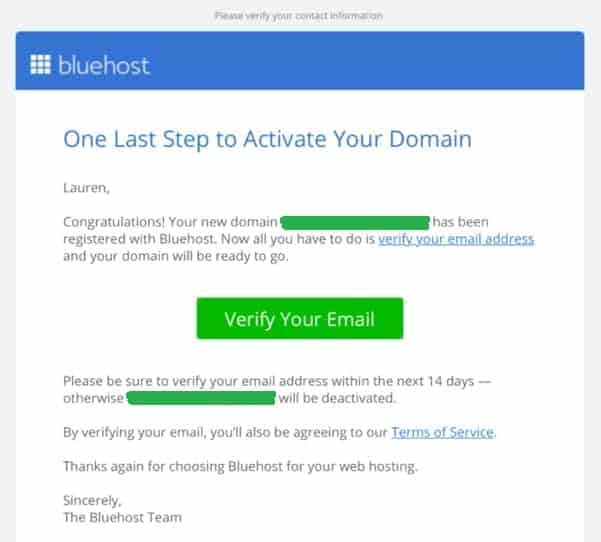
Jetpack is one of the most popular WordPress plug-ins that will help you customize and secure your website. You can create a new account and fill out the necessary information. But you can also sign up with your Google account to speed up the process. Next, you’ll be redirected to WordPress and asked about your address. You can skip this step for now. Now you should visit your email account and verify your email address with Bluehost. You have 14 days to do it, but you should do it immediately, as it will allow you to access your Bluehost dashboard.
You only need to click the green button in your email to complete the verification:
At this point, you are ready to start customizing your blog, and make it beautiful! I’m proud of you. Before we move on, just a quick note on how to access your Bluehost and WordPress dashboards. This is super important because you need to be able to log into your account to access your blog. The easiest way is to log into your Bluehost account with the username and password you’ve created. Once you see the home screen, you should click on the “Login to WordPress” button.

This should be enough to get you started as it allows you to access your WordPress dashboard at any time. The whole process was quite easy, right? Now it’s time to move on to the fun part and start customizing your blog to make it look cool and attractive. Let’s do it!
4. Install a new (slick-looking) theme for your blog
The first thing to know about customizing your blog is that you shouldn’t overdo it. When starting, you should mainly focus on creating amazing new content to market to your readers. The pro-design part will come later. Trust me, over the months and years, you will change the design of your blog many times. So don’t sweat it and start with something simple.
Here’s an excellent example of this kind of simple, but effective blog design:
And here’s another one:
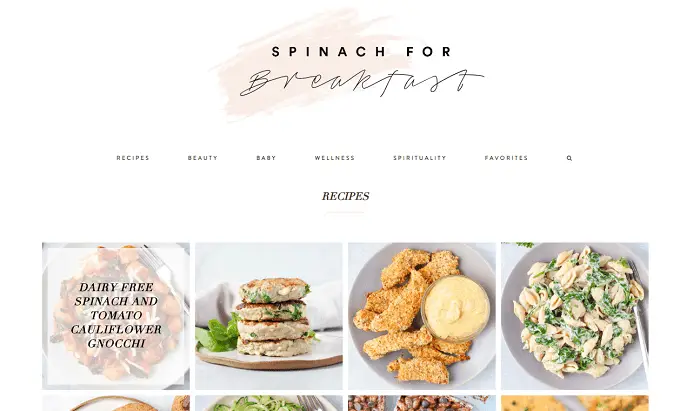
You want your readers to immediately see what kind of blog posts you’ve written over the last days and weeks. But you also want to share bits of personal information on your homepage to start building a relationship with your new fans. Remember, personality and branding play a significant role in the blogging game. But after installing WordPress with Bluehost, your new blog only runs on a simple “bare-bones” theme. This won’t do. You will need something classier and more functional than an essential WordPress theme.
At this point, you can choose from the following options:
a) You can go with a free WordPress theme There are thousands of WordPress themes available on the platform. Starting with a free theme may be a good idea. It enables you to get familiar with the blogging platform without spending extra money. Remember that at the beginning, it’s easy to get confused and bogged down in technical details. So stay calm and give yourself 1 or 2 hours to click around your WordPress site and learn the ropes. Again, the most crucial thing is to cover the basics and start publishing content right away. Otherwise, you are likely to spend your first month dealing with design issues instead of building your audience, and developing buyer personas.
To speed things up, you can use a mighty hack that will save you hours and lots of frustration. If I only knew this when I was starting, I would go for it immediately. There is a website called Fiverr where you can find WordPress theme-related gigs. For $20 to $100, you can get your theme ready, and fully functional within 24 to 48 hours.
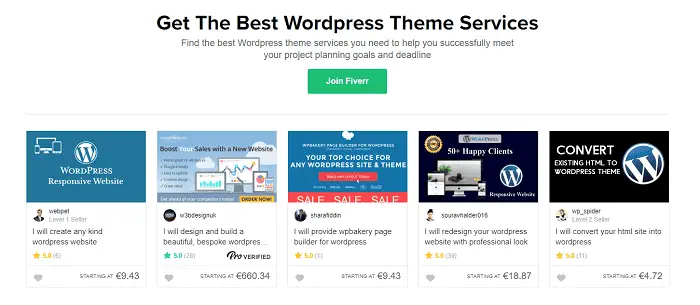
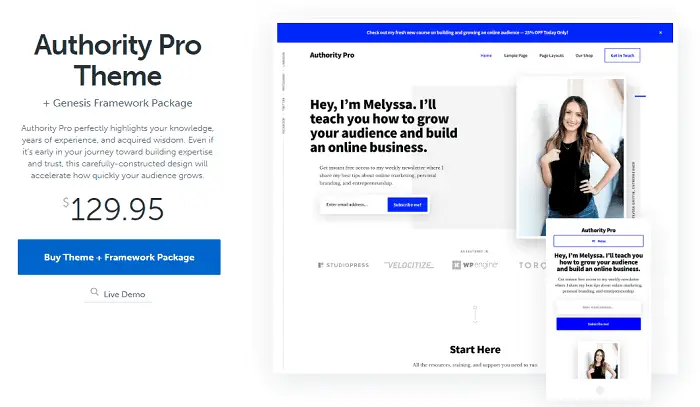
Remember – sometimes it’s much easier to pay someone to solve your problem than to search for the solution yourself. It took me a while to understand this, but now I use services like Fiverr or UpWork all the time to speed things up. b) You can go with a premium WordPress theme A premium WordPress theme usually costs around $50 to $100, but it’s worth the price. Getting the right theme is one of the essential investments you will ever make as a blogger. If you’re strapped for cash, you can still go with a free theme. But if you’re serious about growing your blog, at some point, you will have to invest in a pro-looking theme. I recommend using one from StudioPress as they are easy to install, customize, and use. There’s also a Divi theme and Elementor theme which allows you to build your blog visually without coding (what you see is what you get).
You’ll need to shop around for a while to select the right thing for you (based on your wishes and desires). But again, once you install your desired theme (be it free or premium), I recommend using someone from Fiverr to customize it for you. Instead of dealing with the technicalities, you’ll only need to explain what you want and show examples of other blogs you like. This makes it so much easier for beginners.
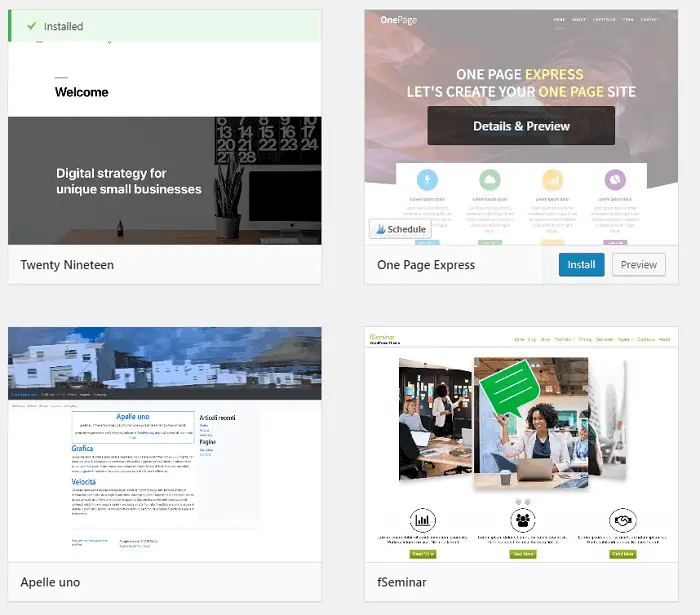
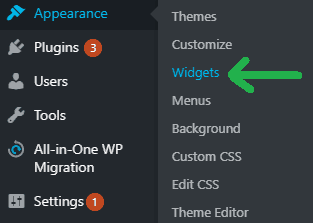
Now I will teach you how to change the theme on your blog:
Once you’re in your WordPress dashboard, click on “Appearance”, and “Themes”, from the menu on the left:
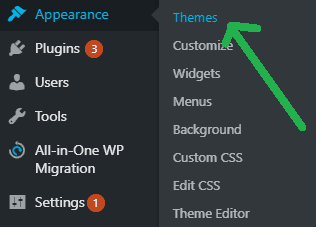
Then you can click on “Add new” to start browsing the directory of free themes. When you find the one you like, click on “install”, and it shall be deployed as a new WordPress theme. In the theme directory, there’s also an “Upload theme” option in the upper menu. You will use this option only if you decide to buy a premium theme.
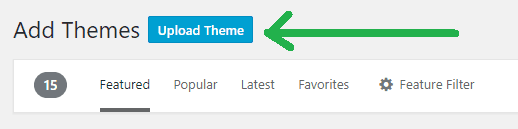
The producer of the theme will allow you to download it as a “zip” file, which you can then upload and install. The final step is to go back to the main themes dashboard and click on “Activate” to implement the theme on your website. Now that you know how to install a theme, we can move to the next important step – grabbing some cool plug-ins.
5. Install basic WordPress plug-ins on your blog
Alright, so you’ve gone through the most critical steps on your journey to becoming a successful blogger. You already have your domain name. You signed up for reliable web hosting (if not, make sure to sign up with Bluehost). You installed WordPress, and you have a basic theme working when you start a new blog. And it didn’t take more than 45 minutes to one hour, did it? Now it’s time to install a couple of crucial WordPress plug-ins (add-ons) that will improve the functionality of your website. They’re like Q’s toys for your Bond car if you catch my drift. For example, you can install a plug-in that will help you share content through social media (Twitter, Facebook, LinkedIn, etc.) or improve your on-page SEO (search engine optimization). There are thousands of plug-ins available on the WordPress platform. And it can be hard to make up your mind about which ones are right for you.
Worry not though, here’s the list of the most popular basic (and free) plug-ins you should install on your website:
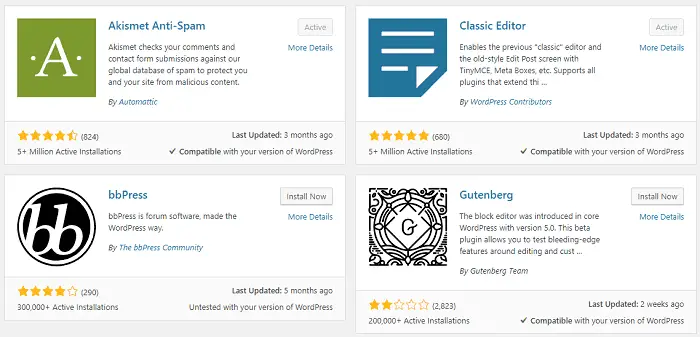
Jetpack – This is an official plug-in produced by WordPress.com. It will help you block spam comments on your blog posts, show you how many users visit your website, and let you know about important updates. It’s a must-have basic for a new blog. All-in-One SEO Pack – This is a neat SEO plug-in that will allow you to better position your website in search engines like Google, Bing, or Yahoo. It will let you pick keywords for which you want to rank and write excellent blog post descriptions to follow Google’s best practices. Another great option is the Yeost SEO plugin so you may want to check it out as well. Wordfence Security – As the name suggests, this is a plug-in that will keep your new blog safe and secure. It will prevent unwanted users from accessing your website. It also acts as an antivirus, and it will protect you from any malware. Remember – security first. UpdraftPlus – Backup / Restore – This plug-in will create regular backups of your blog and store them on your Google Drive or any other cloud-based data storage service. You need a backup of your website in case it gets hacked or you mess something under the hood. With this plug-in, you can bring back the previous (working) version with a couple of clicks. Now you can sleep in peace. Shortcodes Ultimate – Shortcodes are little pieces of code you can insert into your posts to make them prettier and more functional. For example, a shortcode will enable you to embed a YouTube video into your blog. Shortcodes are also useful for creating lists, colored boxes, or tables of contents (like in this article). Akismet AntiSpam – This is the best free Plug-in for protecting you from unwanted spam (especially in the comments section). Install it, activate it, and you’re ready to go. These are the basics. If you want to go further than that you can check out this list of the top plug-ins for WordPress.
Here’s how you install new plug-ins:
Go to “Plug-ins” and then to “Add new.” You can type in the name of your desired plug-in in the search box. Once you have found what you’re looking for, click on “Install” and then “Activate.” Now your new plug-in is active. Most likely you will need to customize your new plug-ins, so click on “Settings” and make the changes you need.
Right now, I have almost 30 different plug-ins installed on my blog. But don’t need as many, especially when you’re starting. Also, keep in mind that some of the plug-ins can slow down your website, so you don’t want to install too many of them. Pro tip: You can monitor the speed of your website with tools like Page Speed Insights from Google Developers.

Now that your plug-ins are installed let’s move on to the next step where you’ll learn how to measure your blog traffic.
6. Install Google Analytics to track your traffic
Google Analytics is a service you can use to track how many visitors your blog receives every day. Blogging is a traffic game more than anything else, so you need a reliable way to measure your performance in this area.
If you already have a Gmail account (who doesn’t?), you can log into Google Analytics and set up your account. Just follow along as the process is super easy, but if you need help, check this article. Once you’re all set up, you will receive the tracking code you will need to place on your blog.
![]()
The good part is that you don’t need to know how to code to complete this task. All you need to do is to go into settings of one of the on-page SEO plug-ins you’ve already installed (in step 4), and paste your tracking code in the right spot. Once you click “save,” Google Analytics will start collecting data which you can check by logging into your Google Analytics account. Sometimes it takes up to 24 hours for the code to start working, so have some patience. Now let’s move on to the next step where you will give a little bit of identity to your new successful blog.
7. Create a header section for your blog
A header will give your blog a unique identity. It’s the part of the website that appears at the very top with a menu of links. Here are a couple of examples of beautiful headers from some of my favorite blogs:
![]()


You need to create something similar on your website. If you have some graphic design skills, you can use online graphic design software like Canva to create an image or logo for your header. Then, depending on the WordPress theme you have, you will be able to customize different parts of your header (like font, size of elements, the size of the image, colors, etc…..) Most of the time, there will be a “Customize” option for that in the “Appearance” menu in WordPress. Make sure you click around and experiment with different ways in which you can change your header. To create a unique one that will distinguish your blog from other websites, you may need some help from a professional coder. Creating something original will require tinkering with CSS and HTML (things you shouldn’t worry about if you’re starting). Again, you can use the services of freelancers on Fiverr, who will customize the header for you for around $20.
8. Install a few useful widgets
Widgets allow you to add extra functionality to your website. For example, they will let you show info about your Facebook page in the sidebar of your blog or display your most popular content categories.
Here are a couple of examples of widgets you can put on your website:
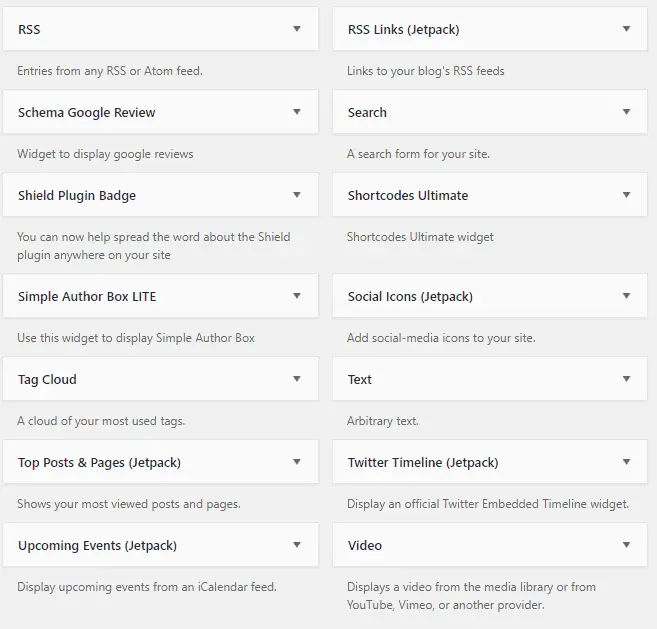
Depending on the theme you’ve installed, you will have a couple of different places where you can place your widgets. These usually include a couple of slots in the sidebar and a couple in the footer. Once you install WordPress, you will be able to find the widgets menu in “Appearance” and then “Widgets.” WordPress comes with many widgets already pre-installed, so you don’t have to look for them in a separate database.
Pick the ones you like and drag them to the sidebar or footer area where you want them to appear. This will require a bit of experimentation, so you’ll need to try out a couple of different options before you’re fully satisfied.
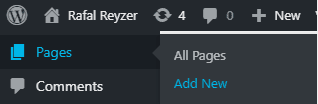
9. Create your first few basic pages that a new blog needs
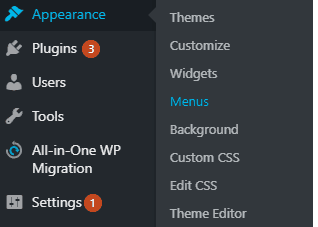
Now it’s time for you to create a few basic pages that will appear in the upper menu. To add a new page, go to “Pages” and then “Add New.”
Then for the page to appear in the header menu, go to “Appearance” and then “Menus.”
Select the page and then click on “Add to the menu.” Notice that you can switch the order of the pages based on your preferences.
Here are the ones that every successful blog needs (in order):
Home
This will serve as a hub for the content on your blog and a page that will show what you’re all about. Make sure that it includes the main keywords you want to rank for in Google.
Blog
Here you will show a list of all the latest posts you’ve made.
About
Here you will provide a little bit of information about yourself. You can include a photo of you and a bit of your personal history. You can also let your readers know what kind of content they expect from you and in which format. Make sure to click around some of your favorite blogs to get more inspiration for the “about” page. You’ll see that some bloggers prefer to keep it short while others write thousands of words to create a stronger bond with their readers.
Contact
Here, you can share links to your social media accounts, so your readers can interact with you on different platforms. But you can also include a contact form (there are plug-ins/ widgets for that), so the readers can contact you directly by filling out an opt-in form. Posting your email address is a bad idea as you can expect many spammers to pick it up and abuse your inbox with unwanted messages. These are the basic pages you should create (this shouldn’t take more than 1 or 2 hours ).
Once you become more advanced, you can produce pages such as:
- Resources – where you list your favorite tools and long-form blog post topics.
- Store – If you ever decide to sell merchandise through your website (you can do it by connecting your blog to an e-commerce platform like WooCommerce ).
- Courses – if you decide to share your knowledge and create online courses that your readers can buy (you can easily do it with a platform like Teachable).
- A promotional landing page like “Free email course” – this kind of page can be helpful if you want to grow your email list. You can create a small free offer and then encourage the visitors to sign up. Then you will be able to continue the relationship with them through email.
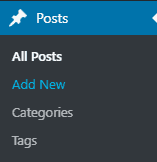
10. Write your first blog post (and learn how to get traffic)
Finally, you are ready to start posting! I hope that previous steps didn’t take more than a couple of hours to complete. Remember, avoid perfectionism at any cost. Just set up the blog as simple as it is, even if it looks like crap. One thing that will motivate you to keep going and achieve success in the blogging sphere is attracting new readers and picking new exciting blog topics. As a beginner, you can only achieve this goal by regularly posting new articles on your blog. So don’t worry, you can take care of all the technical difficulties later. Your blog will evolve as you grow and increase the budget you can spend on blog development. For now, create a list of titles for your 30 new blog posts (preferably in Google Docs or Google Sheets so you can access it from any device). Always focus your efforts on the keywords that people are searching for. If you’re a writer, you could start with an article like “How to write the first chapter of your novel” or “How to create tension between characters in a romance novel.” Type your keywords into Google and see what kind of articles come up in the results. Click around, read, and try to create something better than is already available online.
Always aim for long-tail keywords if you’re a newbie. They are much easier to rank for. Also, once you get these first few visitors, it will encourage you to keep going and pump out more content. If you want to attract organic traffic to your blog, aim for 1000 words minimum per article (but it depends on the competition for the given keyword). Put writing thirty blog posts to goal in front of your face and don’t stop until you accomplish it. This content will be a solid foundation for your future blogging efforts. To publish a post, go to “Posts” and then “Add new.” If you’re familiar with text formatting software like Microsoft Word, you will find your way around the WordPress post editor.
Don’t worry about being perfect. It’s never perfect. Just do the best you can and hit the “publish” button. It will usually take a couple of weeks for you to start seeing first visitors checking out your content. But you have my word; this will be one of the most exhilarating moments in your writing life. Now, that you have your first few blog posts going, make sure you offer your readers a way to sign up for your email list. We’ll take care of that in the next step.
11. Start an email list from day one
As a beginner, you can sign up for a free email marketing service like MailChimp, or if you want to go more advanced, sign up for ConvertKit (which I’m using). Setting it up is a topic for a whole article. Just keep in mind that it’s best to start building your email list as soon as possible. An email list is an asset that you own, and you can use it to keep in touch with your readers. This comes in handy, especially if you have special offers or you want to promote or you wrote an epic blog post. With time your email list will become more and more valuable, so don’t miss an opportunity to build it. You can do it by offering freebies to your readers in exchange for their email addresses. To allow them to sign up, you can use opt-in forms, pop-ups, and other tactics.
12. Don’t waste your time on technicalities – ask for (cheap) help from professionals
I wish someone explained this to me when I was starting. I always tried to figure out every technical problem on my own. But ultimately, this resulted in a massive waste of time and energy. Know that you should always ask for help if you are lost. There are many WordPress-related forums, Facebook groups about blogging, and helpful YouTube channels where you can post questions and receive answers. If you don’t know how to install an opt-in box on your blog, or you are not sure about how to customize your header, you can also hire someone from Fiverr to solve this problem for you. Yes, this will cost $10-$20, but it will allow you to save hours of valuable time. Remember that your primary focus should be on producing high-quality content for your readers, not dealing with minor technical problems. If you focus on the next step (writing, publishing, promoting), in a couple of months, you will have a thriving blog with a loyal audience.
13. Start writing, publishing, and promoting – persist until you succeed
Now that you have the basics of your new blog set up, your next mission is to start writing and publishing amazing content. Here, consistency is vital. To develop a schedule ( let’s say 1000 words a day), do your best to stick to it, and track your progress. I use a Google Sheets spreadsheet to set goals for my blog and record how many new articles I publish every month. I even track how many words I write every day. I’ve found that keeping an eye on my progress keeps me motivated and enables me to improve my results over time.
And here’s the secret to success for a new blogger:
It’s not about posting on social media, networking, link building, or some other tactical stuff. It’s about picking the right keywords, producing top-notch content around these keywords, and then publishing this content. If you do this and nothing else, you can start attracting tens of thousands of readers to your blog within a single year. I wish someone told me this secret when I was starting.
14. Monetize your blog and earn $$$ from your efforts
Once your blog starts getting traction you can use the following monetization tactics to get paid for your efforts:
- Display advertising
- Affiliate marketing
- Product creation
- Online course creation
- Software creation
- E-book writing and promotion
- Professional services
- Coaching
- Creating a mastermind group
Here are more resources that will enable you to get started with your writing blog:
- 19 Best Blogging Resources & Tools (For Pros)
- 14 Best Books On Blogging (For Max Results)
- 45 Things I Wish I Knew Before Starting a Blog
What advantages in the blogosphere do you have as a writer?
Writers of all kinds are potential candidates for superstar bloggers. Think about it – you already have a passion for language, you know how to communicate through the written word, and you have the discipline to complete writing projects on time. These are all essential skills of a latent blogging mogul. The #1 reason why most newbie bloggers fail is that they give up too fast. When you first start writing and publishing, significant results may elude you for up to three months (sandbox period). That’s why mindset plays such a massive role in the blogging macrocosm. Prepare for the long-term game and learn to manage your expectations. Now check it… I recently read interviews with 17 different full-time bloggers who earn $8,000 or more per month. They had to answer the same question: “How long did it take for you to reach $8k a month with your blog?” The majority of them said it took around 2,5 to 3 years of consistent effort. For some of them, it was quicker (18 months). For others, it took longer (4-5 years). But all-in-all these people (and thousands more around the world) show that it’s possible. For you as well! So stop procrastinating and take action now, partner. I promise it will take less than 1 hour. Start the timer and let’s do it now!
Why should you start your blog now?
The success and moneymaking opportunities have never been greater for bloggers than now. There are some negative voices out there, saying that “blogging is dead.” But that’s simply not true. Yes, there are other avenues available (like Vlogging or Podcasting). But these are not for everyone, and as a writer, you’ll be naturally inclined to produce text-based content. I started my blog relatively recently, and my traffic and income are regularly growing. This has been the experience for thousands of people who learn how to create a steady income from their websites. If you learn the basic skill set, and then back it up with action, you are bound to be successful.
There are a couple of reasons why starting a blog now is a great idea:
The net amount of traffic around the web is increasing Not the whole planet is hooked up to the internet yet. More and more people are coming (and spending money) online, even in developed countries like the US or the UK. And think about developing places like India, Europe, or half of Africa, with millions of English speakers. There are more opportunities for bloggers to earn money Advertising networks like MediaVine, Ezoic, or AdThrive are now using machine learning, which enables bloggers to maximize their ad revenue. Affiliate networks (services that allow you to promote third-party products) are paying big commissions. You can partner up with brands and earn money through sponsored posts. You can also create your product and make money by supporting a community of readers. The possibilities are endless. There are many more niches to explore, and the competition is not as high as you may imagine I just heard about a blogger who’s making $220,000 a year blogging about succulents. Yep, a small sub-niche of the plant industry. If that’s possible, then imagine what kind of niches you could explore and become successful in. There are better tools available than ever before A whole industry mushroomed around supporting bloggers with the best tools. Now obtaining web hosting, installing WordPress, and building an email list has never been easier. You don’t even need technical skills to get started. And if you’re stuck somewhere along the way, you can use inexpensive online services to solve your issues within 24 hours.
Now stop putting it off and start your own thing already
Many people who think about getting their blog off the ground fall into “analysis paralysis.” You may feel like you need to get more info before you pull the trigger. There must be some secret formula that will enable you to achieve success faster, right? You may feel like watching 10 YouTube videos and contemplating blogging a bit more. But here’s the news: “There’s no magic bullet or secret formula.” Listen carefully: Your brain is inventing excuses to keep you in your comfort zone. All success in blogging comes from taking consistent, imperfect action. You’ll need to get used to minor screw-ups and keep pushing. Taking action is the only way to get there. So do it, and do it now. And then persist until you reach the success you desire. Cheers! Next up, you may want to explore a guide on how to write like a journalist.

Get your free PDF report: Download your guide to 100+ AI marketing tools and learn how to thrive as a marketer in the digital era.

Rafal Reyzer
Hey there, welcome to my blog! I'm a full-time entrepreneur building two companies, a digital marketer, and a content creator with 10+ years of experience. I started RafalReyzer.com to provide you with great tools and strategies you can use to become a proficient digital marketer and achieve freedom through online creativity. My site is a one-stop shop for digital marketers, and content enthusiasts who want to be independent, earn more money, and create beautiful things. Explore my journey here, and don't miss out on my AI Marketing Mastery online course.