
The use of a green background helps blur the boundaries of what seems to be possible and expands the possibilities of creative videography.
The whole concept might seem complicated to a newbie, but delving into the creation of captivating videos using a green screen template demands neither substantial investment in high-end equipment nor a professional filming crew. All it takes is a smartphone and the right TikTok editing app. Using a green screen is one of the most budget-friendly tactics you can take advantage of to make your videos pop and attract the attention of your audience. Let’s explore how green screens work, and how to make the most of them.
The Basics of Green Screens
Using a green screen hinges on the fusion of two images, with completely different color spectrums. The deliberate selection of a vivid green hue stems from its infrequent overlap with the colors of human skin or clothing. It’s pretty easy to use a green screen: start by capturing the subject or individual set against a lively green backdrop. Next, use the exceptional CapCut video editing app (which is free by the way), to replace each green pixel with an alternative background image or video clip. This method streamlines the choice of a new background, allowing you the flexibility to either record a new video or import ready-made footage into the background.
You can set up a green screen at home or in your office, and replace the green background with whatever you want within a matter of seconds!
How to use a green screen in CapCut?
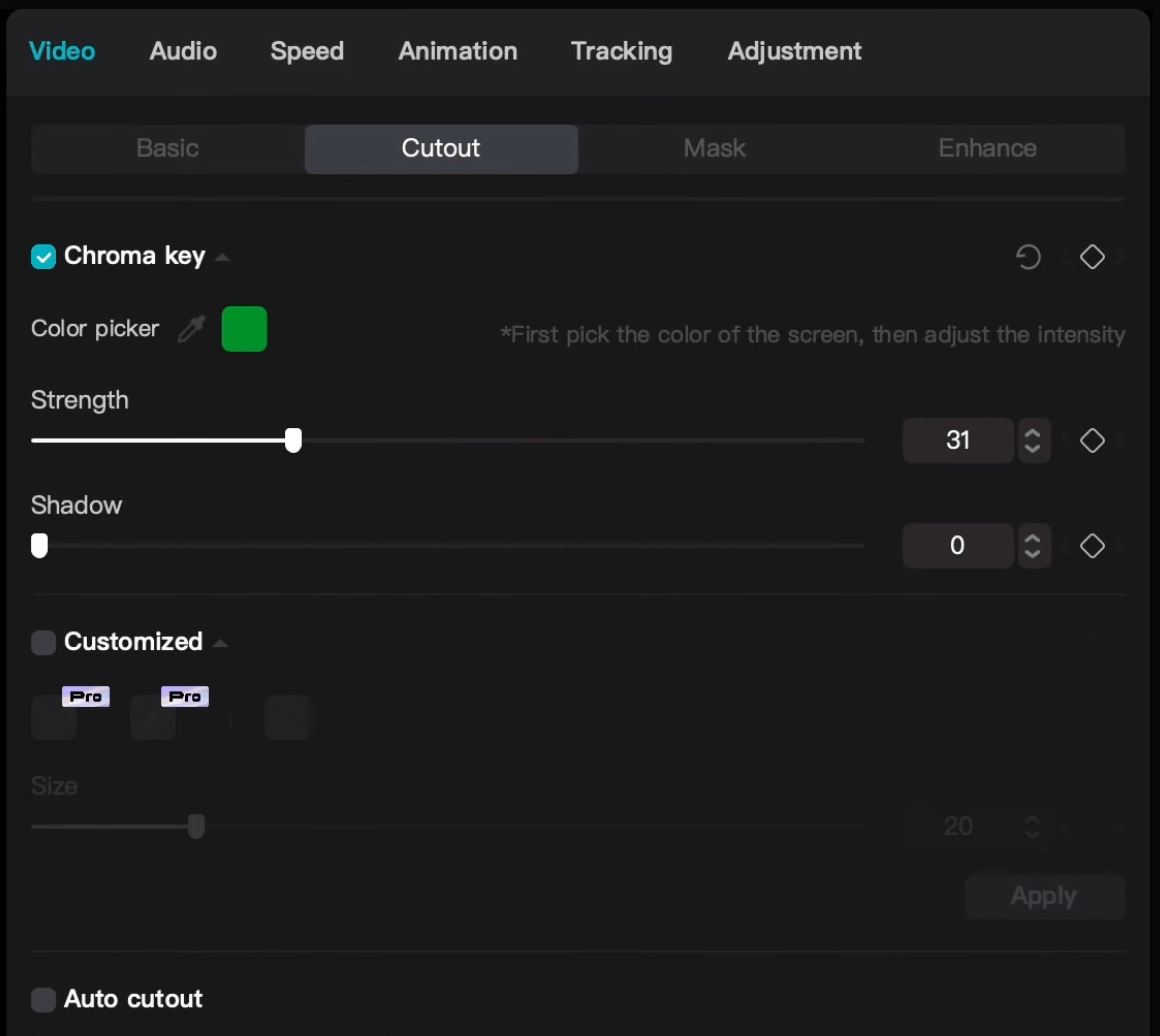
First, you need a clip with a green background (either one you produced yourself or one downloaded from the web). Next, you put it on the timeline, go to the “Video” setting, then “Cutout”, then “Chroma Key” and you point to the green color in the video. After that, you only need to move the “strength” slider to the right and the green background will completely disappear allowing you to place anything you want in the background instead!
Creating Your Green Screen Setup: Essential Components
Embarking on your DIY green screen adventure is easier than you might think, and the beauty of it lies in its simplicity and affordability. To get started, you’ll need the following essentials:
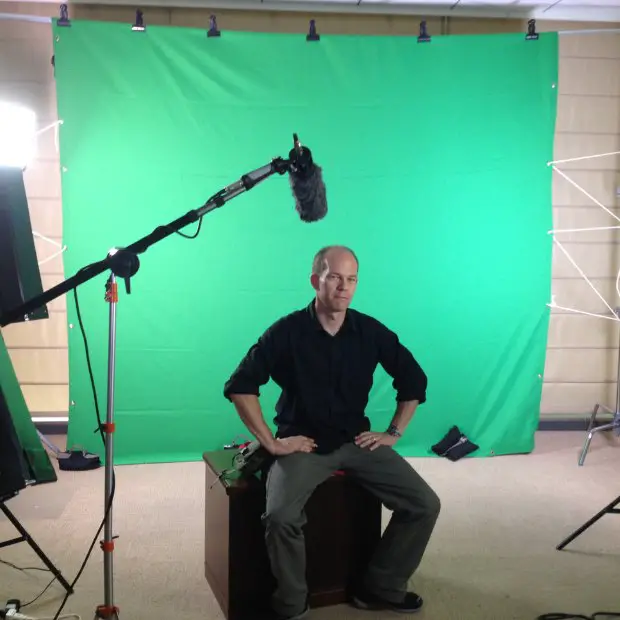
- Green Background: The cornerstone of your setup is the green background. While any green cloth can work, opt for a material that’s non-reflective and uniform in color. A special green screen fabric is ideal, but in a pinch, a plain green bedsheet or a roll of green paper can suffice. The key is to ensure it’s wrinkle-free and evenly colored to avoid shadows and color inconsistencies.
- Camera: The great news is that you don’t need a high-end camera to create amazing green screen effects. Your smartphone is more than capable. Modern smartphones have excellent video capabilities and, when used correctly, can yield professional-looking results. Just make sure to keep it steady – a tripod or a stable surface can help with this.
- Lighting Equipment: Good lighting is crucial. It’s not just about making the subject look good, but also about ensuring the green screen is evenly lit to facilitate easy editing. If you’re on a budget, even a couple of well-placed desk lamps can do the trick. The goal is to have a uniform, soft light without harsh shadows. Consider using diffusers to soften the light if it’s too intense.
- Video Editing Software: There are several other accessible options for editing your green screen footage. Free or low-cost software like CapCut, iMovie, HitFilm Express, or DaVinci Resolve can offer more control and features for green screen editing. These tools allow you to key out the green background and replace it with whatever imagery you choose, be it fantastical landscapes, urban settings, or abstract backgrounds.
Remember, the magic of green screens lies in their ability to transport you anywhere, limited only by your imagination. By ensuring you have these basic elements in place, you’re well on your way to creating visually stunning and creative videos that captivate your audience. Whether you’re a budding filmmaker, a content creator, or just experimenting for fun, these tools will empower you to bring your visionary ideas to life.
Lighting & Editing: The Make-or-Break of Green Screen Magic
Getting the lighting right on your green screen is crucial. Think of it as the backstage hero of your video:
- Even It Out: Light your green screen evenly. No shadows, no bright spots. This makes the editing process smoother and keeps your background from looking like a patchwork quilt.
- Light Up Your Star: Your subject needs the spotlight, but not literally. Use soft, balanced lighting to avoid harsh shadows and green spills. Keep them a few feet from the screen to maintain the illusion.
- Banish Shadows and Glare: Shadows on your green screen? Big no-no. They’re like uninvited guests in your video. Position your lights to keep these party crashers out. And watch out for glares on your subject – nobody likes a shiny forehead.
- Edit Like a Pro: Now, the editing magic. Remove the green screen with the precision of a surgeon. Make sure your subject blends into the new background like they were always meant to be there. Any green edges or choppy outlines? Show them the door.
- Seamless Fusion: Your final act is to make your subject and background one. Tweak the colors, shadows, and light in your editing tool until they look like they’re in the same world. This is where your video goes from ‘good try’ to ‘how did they do that?’
Remember, in the green screen world, lighting and editing are your best friends. Nail these, and you’re not just making videos; you’re creating worlds.
Using green screen effects in a variety of ways
When harnessing the power of a screen, the background you choose becomes the linchpin, setting the mood and tone for your video. Unleash creativity by incorporating photos, videos, abstract landscapes, or cityscapes for an original touch. Elevate visual impact by seamlessly integrating animations and special effects, effortlessly achievable with the state-of-the-art TikTok video editor. The green screen technique unveils a canvas of creative possibilities, allowing the creation of diverse images and characters. Whether changing costumes, embodying beloved movie or comic characters, or assuming various roles in your videos, the potential for artistic expression knows no bounds.
Conclusion and next steps
Now it’s up to you to decide whether you want to experiment with a green screen or not. You need a proper space to set it up, but if you don’t have a natural spot with a nice background where you can comfortably record, a green screen is the next best thing. Just remember to build a solid reason you need to set it up, and then experiment with various backgrounds as much as possible to find what you need. Next up, you may want to explore a guide on creating ASMR videos.

Rafal Reyzer
Hey there, welcome to my blog! I'm a full-time entrepreneur building two companies, a digital marketer, and a content creator with 10+ years of experience. I started RafalReyzer.com to provide you with great tools and strategies you can use to become a proficient digital marketer and achieve freedom through online creativity. My site is a one-stop shop for digital marketers, and content enthusiasts who want to be independent, earn more money, and create beautiful things. Explore my journey here, and don't forget to get in touch if you need help with digital marketing.